Visual Strategy Browser

Browse the visual pickleball strategy diagrams that form the foundation of the Pickleball Strategy app and book. Use the filters below to explore every phase of the game.

Complete explanations for every diagram are available in:
📱 App: Pickleball Strategy – 3.5+ Player App
📘 Book: Pickleball Strategy – A Guide to 3.5 and Beyond

85 diagrams

Safe Deep Serve

Safe Deep Serve pickleball strategy diagram

Deep Serve Causes a Short Return
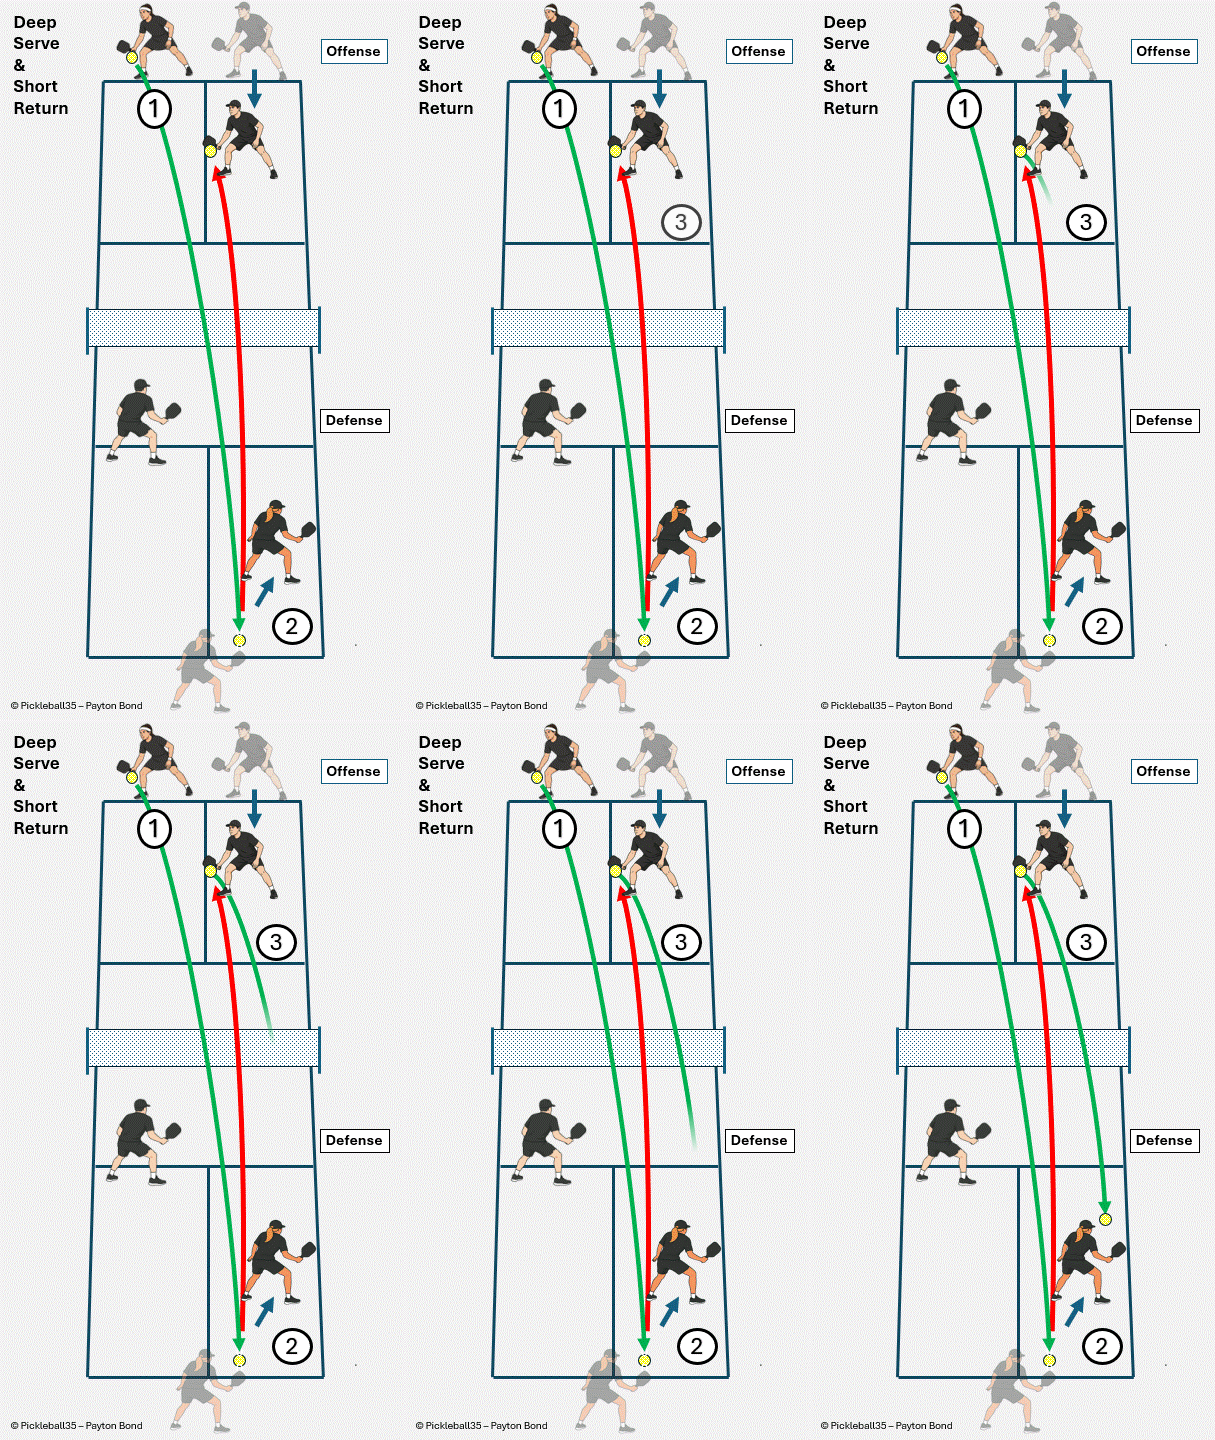
Deep Serve  Causes a Short Return pickleball strategy diagram

Serve Mistake: Excessive Power

Serve Mistake: Excessive Power pickleball strategy diagram

Serve Mistake: Short Surprise Serve

Serve Mistake: Short Surprise Serve pickleball strategy diagram

Serve Mistake: Targeting the Lines

Serve Mistake: Targeting the Lines pickleball strategy diagram

Vary Your Serve to Reduce Predictability

Vary Your Serve to Reduce Predictability pickleball strategy diagram

Offense Mistake: Partner Steps In

Offense Mistake: Partner Steps In pickleball strategy diagram

Defense Setup: Starting Positions

Defense Setup: Starting Positions pickleball strategy diagram

Defense Mistake: Returner Too Far Forward

Defense Mistake: Returner Too Far Forward pickleball strategy diagram

Defense Mistake: Not at the kitchen Line

Defense Mistake: Not at the kitchen Line pickleball strategy diagram

Serve Targeting

Serve Targeting pickleball strategy diagram

Spin Serves

Spin Serves pickleball strategy diagram

Spin Serve Technique

Spin Serve Technique pickleball strategy diagram

The Lob Serve

The Lob Serve pickleball strategy diagram

Serve Stacking: Overview

Serve Stacking: Overview pickleball strategy diagram

Serve Stacking: Setup

Serve Stacking: Setup pickleball strategy diagram

Serve Stacking: Movement

Serve Stacking: Movement pickleball strategy diagram

Defensive Stacking: Overview

Defensive Stacking: Overview pickleball strategy diagram

Defensive Stacking: Setup

Defensive Stacking: Setup pickleball strategy diagram

Defensive Stacking: Movement

Defensive Stacking: Movement pickleball strategy diagram

Serve Return: Focus on Your Early Advantage

Serve Return: Focus on Your Early Advantage pickleball strategy diagram

Return Pre-Shot Thoughts

Return Pre-Shot Thoughts pickleball strategy diagram

Hitting the Return

Hitting the Return pickleball strategy diagram

Serve Return Common Mistakes

Serve Return Common Mistakes pickleball strategy diagram

Advancing After the Return

Advancing After the Return pickleball strategy diagram

Defensive Mistake: Freezing After the Return

Defensive Mistake: Freezing After the Return pickleball strategy diagram

Returning a Topspin Serve

Returning a Topspin Serve pickleball strategy diagram

Returning a Backspin Serve

Returning a Backspin Serve pickleball strategy diagram

Handling Spin on the Serve Return

Handling Spin on the Serve Return pickleball strategy diagram

Two Right-Handed Opponents

Two Right-Handed Opponents pickleball strategy diagram

Right-Handed Pair – Server on the Opposite Side

Right-Handed Pair – Server on the Opposite Side pickleball strategy diagram

Mixed Pair – Two Backhands in the Middle

Mixed Pair – Two Backhands in the Middle pickleball strategy diagram

Left-Handed Server with Right-Handed Partner

Left-Handed Server with Right-Handed Partner pickleball strategy diagram

Return Against Stacking – Right Handed Serving

Return Against Stacking – Right Handed Serving pickleball strategy diagram

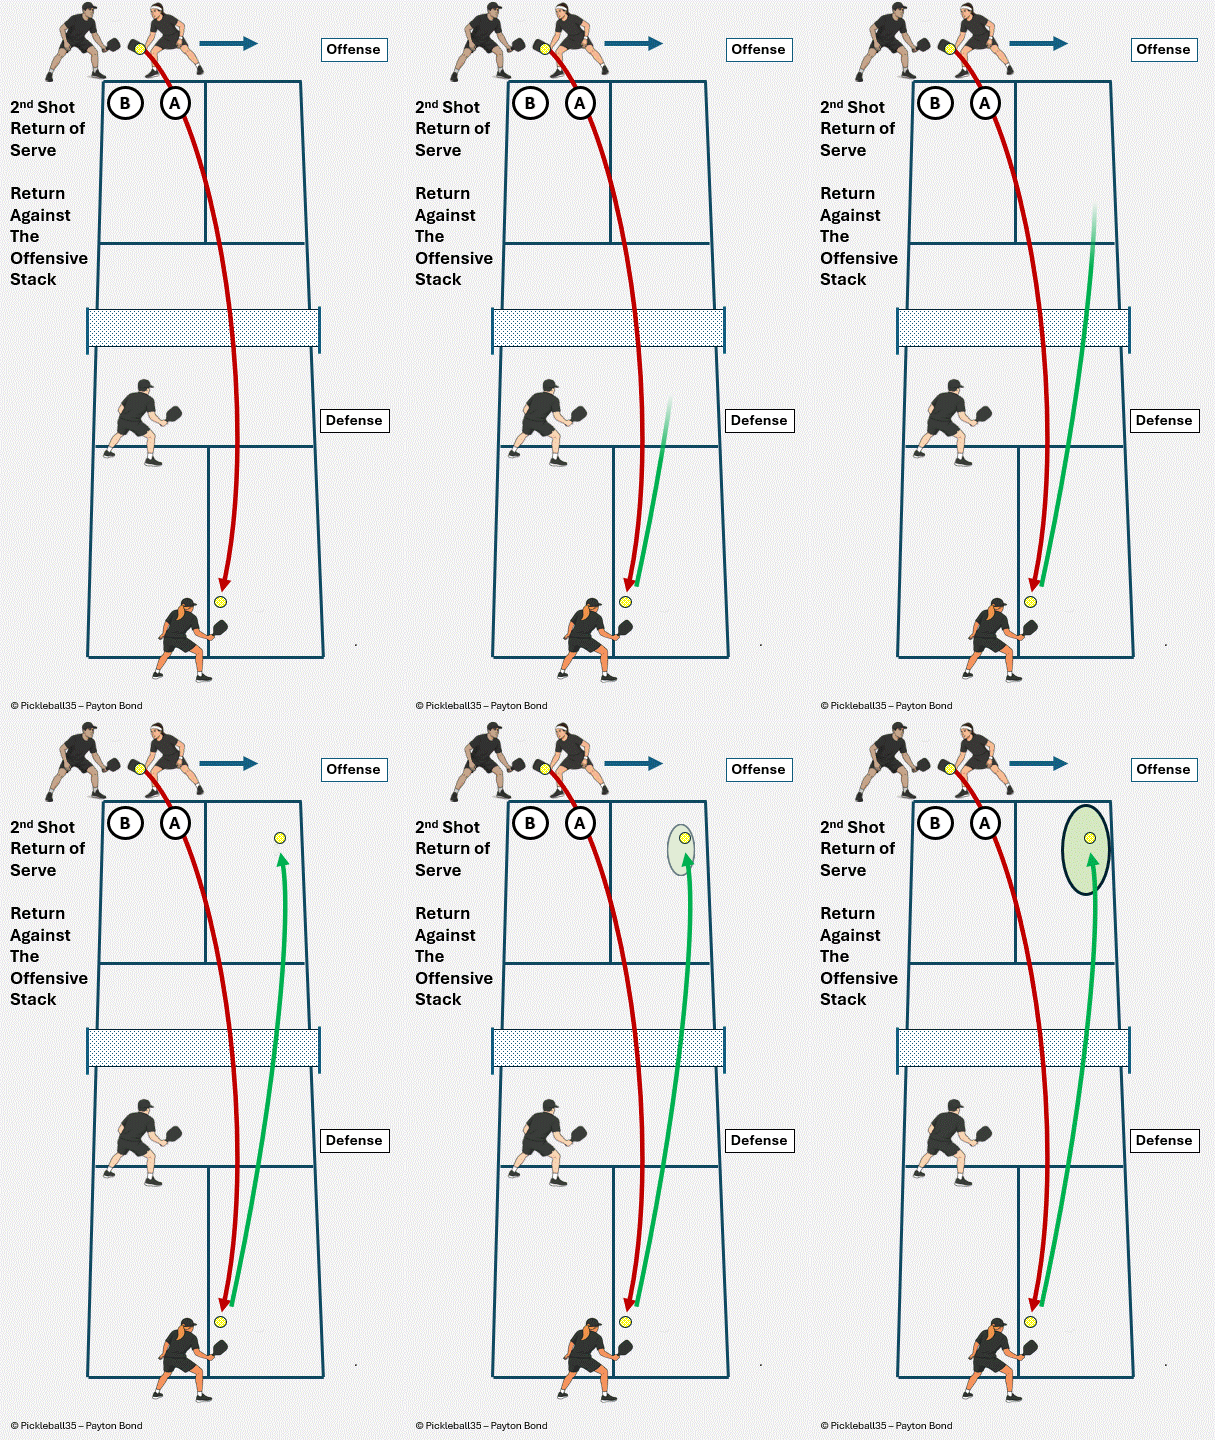
Return Against Stacking – Left Hand Serving

Return Against Stacking – Left Hand Serving pickleball strategy diagram

Using Spin on the Serve Return

Using Spin on the Serve Return pickleball strategy diagram

Third Shot Setup – Recognizing the Decision Moment

Third Shot Setup – Recognizing the Decision Moment pickleball strategy diagram

Third Shot Communication – Call the Shot Clearly

Third Shot Communication – Call the Shot Clearly pickleball strategy diagram

Forehand in the Middle – Stepping In to Take the Third Shot

Forehand in the Middle – Stepping In to Take the Third Shot pickleball strategy diagram

Respect the X – Maintaining Natural Court Responsibility

Respect the X – Maintaining Natural Court Responsibility pickleball strategy diagram

Third Shot Options

Third Shot Options pickleball strategy diagram

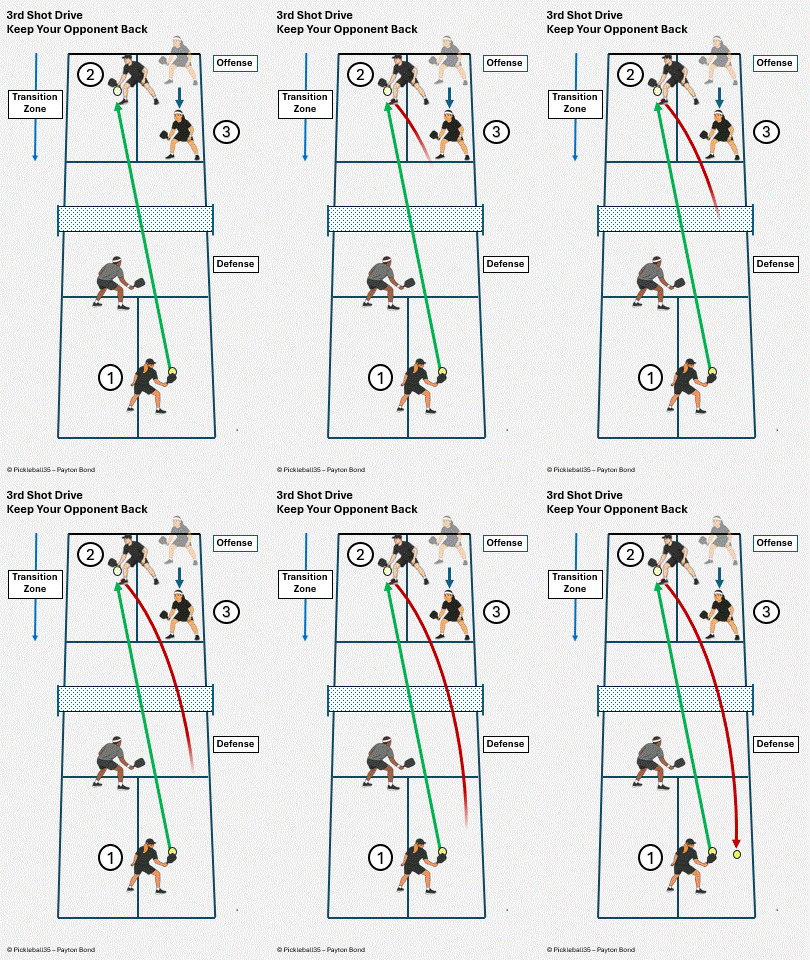
Third Shot Drive – Best Time to Use

Third Shot Drive – Best Time to Use pickleball strategy diagram

Third Shot Drop – Best Option Against Set Opponents

Third Shot Drop – Best Option Against Set Opponents pickleball strategy diagram

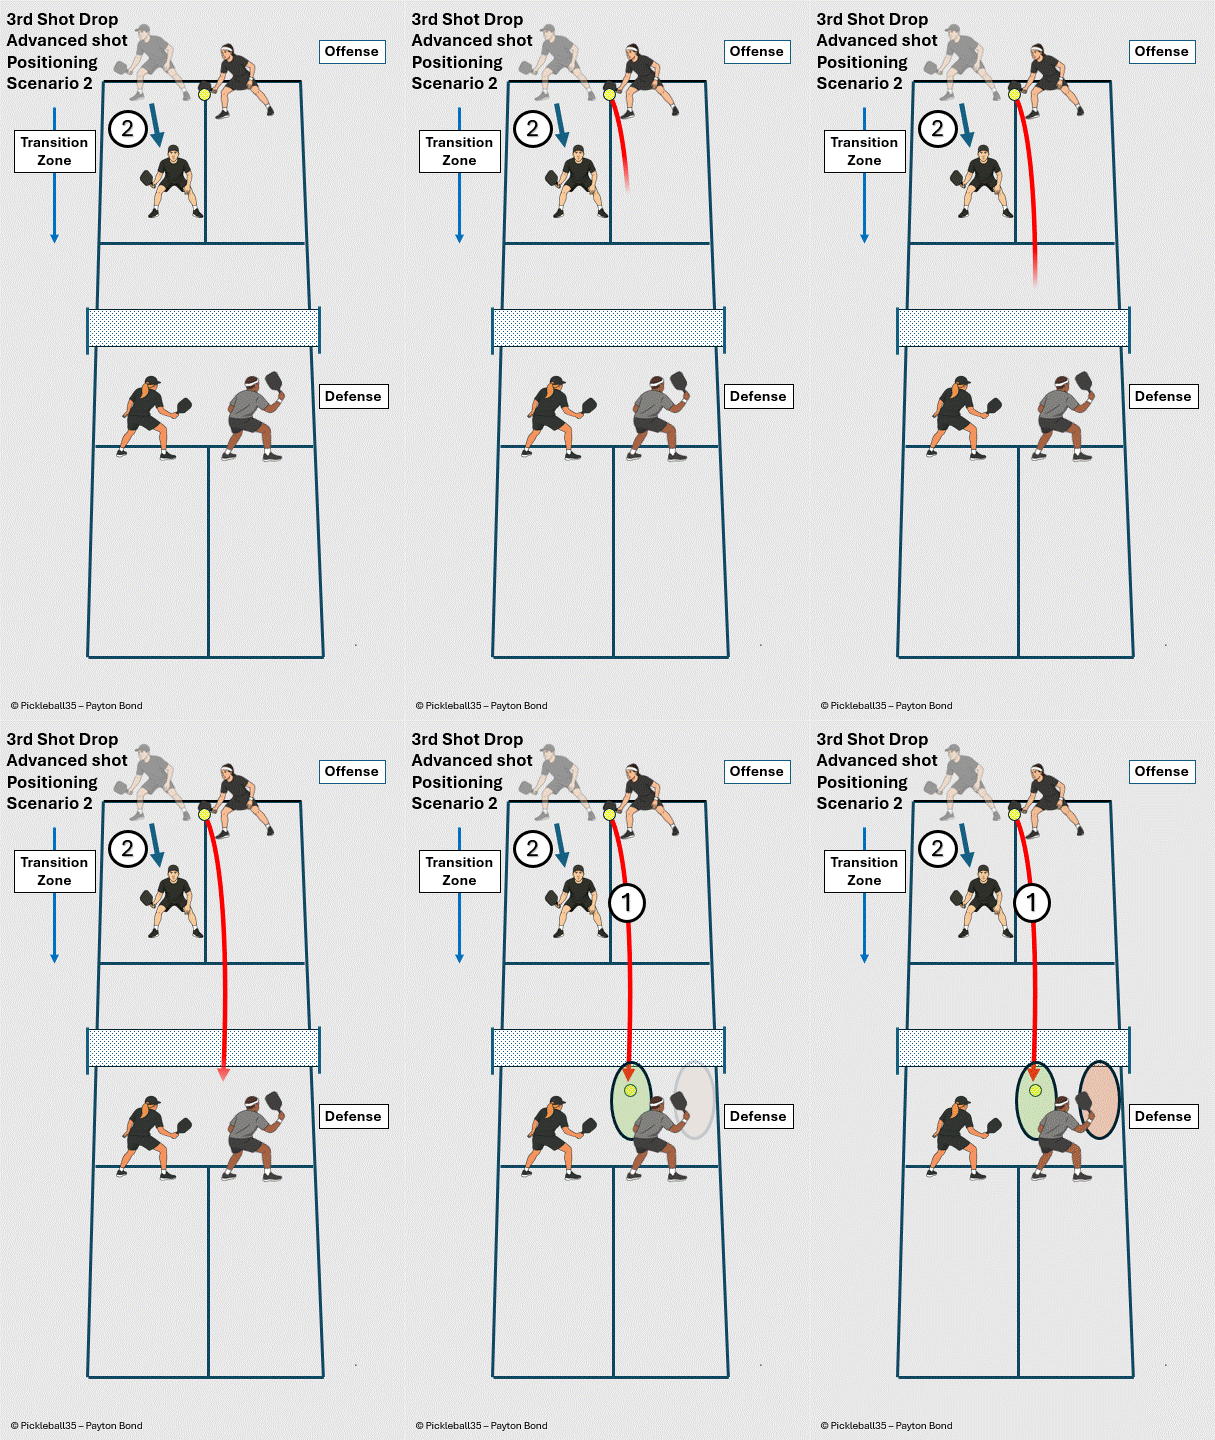
Third Shot Drop – Target the Middle

Third Shot Drop – Target the Middle pickleball strategy diagram

Third Shot Drop – Advance to the kitchen

Third Shot Drop – Advance to the kitchen pickleball strategy diagram

Third Shot Lob – Push Opponents Off the Kitchen

Third Shot Lob – Push Opponents Off the Kitchen pickleball strategy diagram

Third Shot Lob – Advance After a Successful Lob

Third Shot Lob – Advance After a Successful Lob pickleball strategy diagram

Shake and Bake

Shake and Bake pickleball strategy diagram

Drive and Reset

Drive and Reset pickleball strategy diagram

Pinching the Middle

Pinching the Middle pickleball strategy diagram

Blocking a Third Shot Drive

Blocking a Third Shot Drive pickleball strategy diagram

Third Shot Drop – Target the Backhand Foot

Third Shot Drop – Target the Backhand Foot pickleball strategy diagram

Third Shot Drop – Target the Player in Front of Your Partner

Third Shot Drop – Target the Player in Front of Your Partner pickleball strategy diagram

Third Shot Drop – When Both Forehands Are in the Middle

Third Shot Drop – When Both Forehands Are in the Middle pickleball strategy diagram

Third Shot Drop – No Forehand in the Middle

Third Shot Drop – No Forehand in the Middle pickleball strategy diagram

The 5th and 7th Shot Drop

The 5th and 7th Shot Drop pickleball strategy diagram

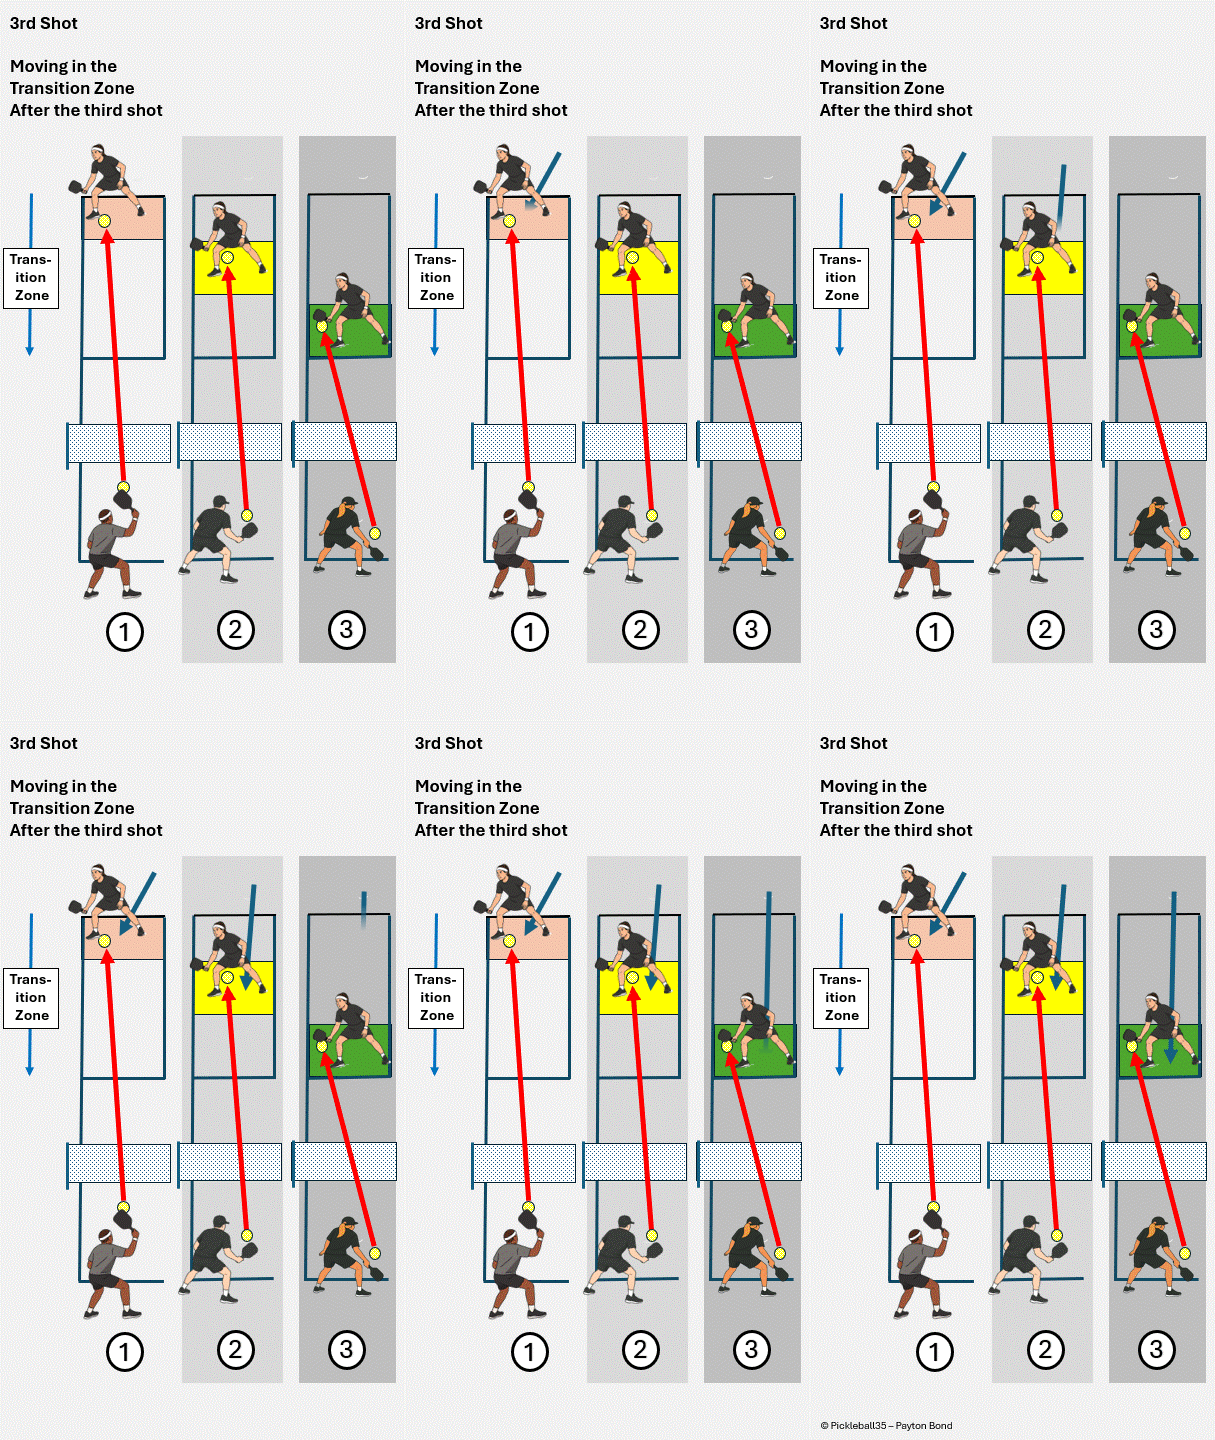
Moving in the Transition Zone

Moving in the Transition Zone pickleball strategy diagram

Third Shot Drop – Move Forward Together

Third Shot Drop – Move Forward Together pickleball strategy diagram

Third Shot Drop Success – Put Away a Popup

Third Shot Drop Success – Put Away a Popup pickleball strategy diagram

Third Shot Drop Mistake – Rushing In

Third Shot Drop Mistake – Rushing In pickleball strategy diagram

Third Shot Drop Mistake – Drawing Opponent Forward

Third Shot Drop Mistake – Drawing Opponent Forward pickleball strategy diagram

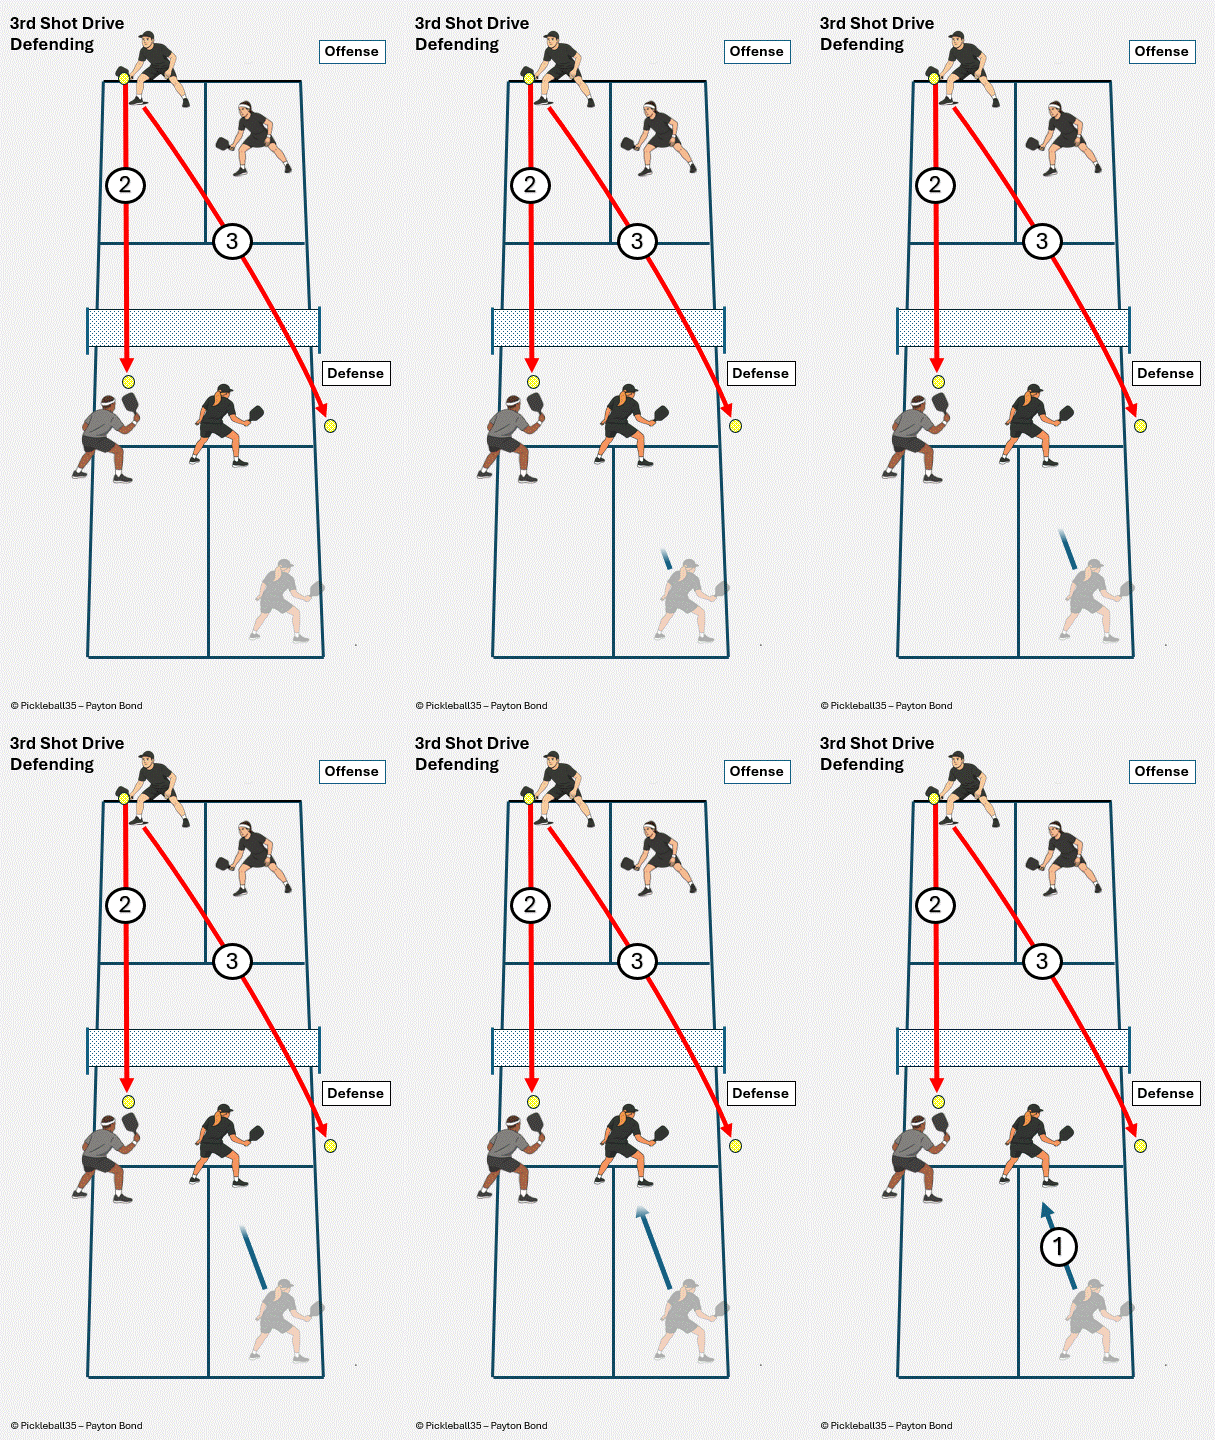
Drop Shot Defense - Volley

Drop Shot Defense - Volley pickleball strategy diagram

Drop Shot Defense - Volley Decisions

Drop Shot Defense - Volley Decisions pickleball strategy diagram

Drop Shot Defense - Dink

Drop Shot Defense - Dink pickleball strategy diagram

Drop Shot Defensive Mistake - Backing Up

Drop Shot Defensive Mistake - Backing Up pickleball strategy diagram

Reset Shot

Reset Shot pickleball strategy diagram

Poaching the Third Shot

Poaching the Third Shot pickleball strategy diagram

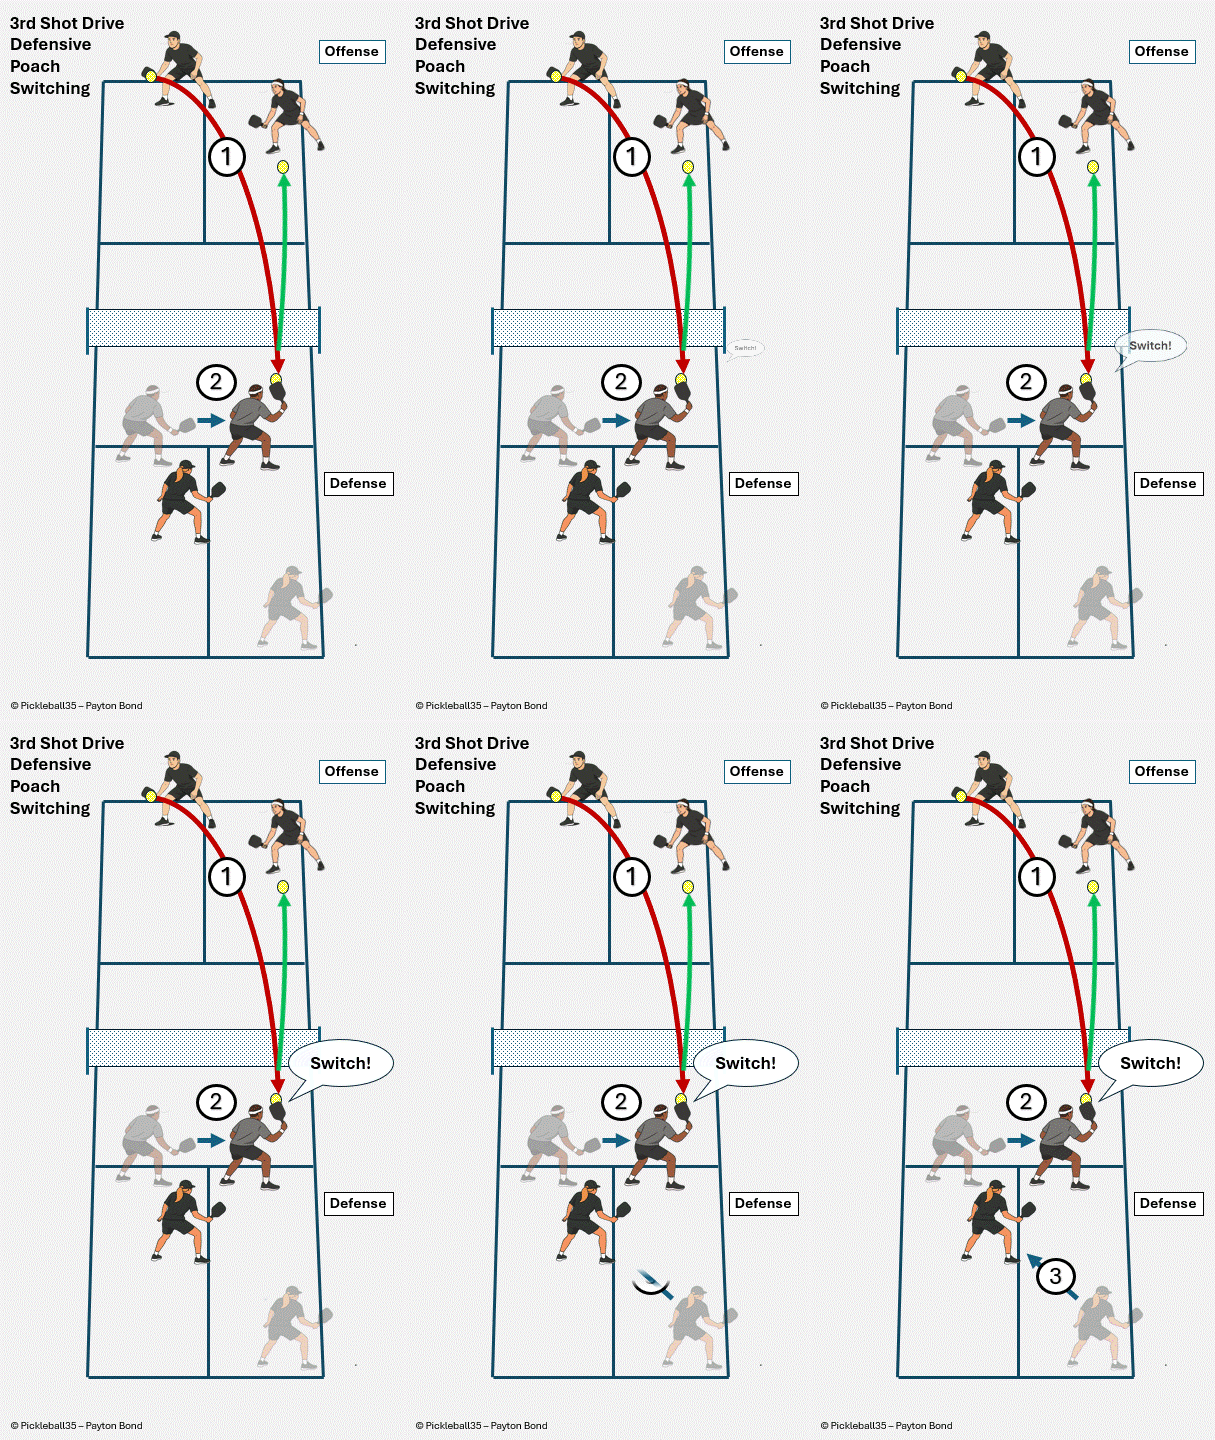
Poach and Switch

Poach and Switch pickleball strategy diagram

Poach Mistake: Moving Too Early

Poach Mistake: Moving Too Early pickleball strategy diagram

Smash Basics

Smash Basics pickleball strategy diagram

Angle Smash

Angle Smash pickleball strategy diagram

Lob Switch

Lob Switch pickleball strategy diagram

Dinking Overview

Dinking Overview pickleball strategy diagram

Dinking Footwork and Tethering

Dinking Footwork and Tethering pickleball strategy diagram

Cross-Court Dink

Cross-Court Dink pickleball strategy diagram

Forward Dink

Forward Dink pickleball strategy diagram

Attacking an Attackable Dink

Attacking an Attackable Dink pickleball strategy diagram

Dinking Mistake – Lack of Patience

Dinking Mistake – Lack of Patience pickleball strategy diagram

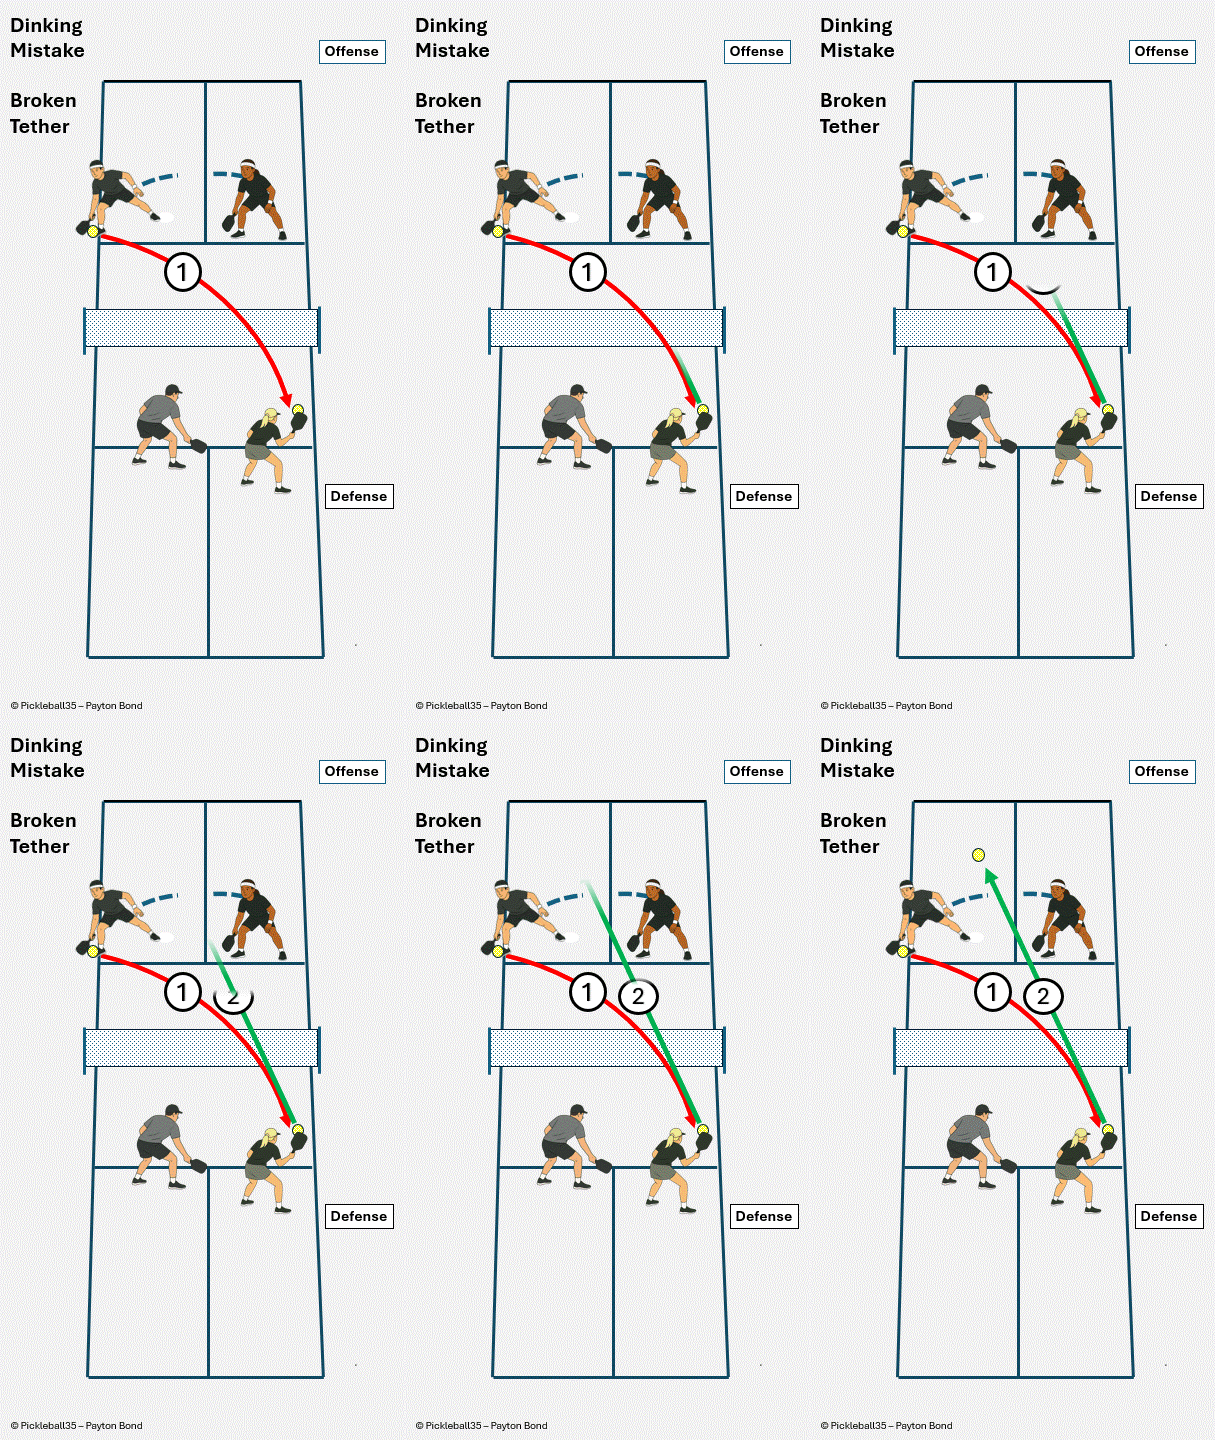
Dinking Mistake – Broken Tether

Dinking Mistake – Broken Tether pickleball strategy diagram

Dinking Mistake – Caught in the Kitchen

Dinking Mistake – Caught in the Kitchen pickleball strategy diagram

Volley Dink

Volley Dink pickleball strategy diagram

Put Away and Dink Fake

Put Away and Dink Fake pickleball strategy diagram

Dink Fake Lob

Dink Fake Lob pickleball strategy diagram

Around the Post (ATP)

Around the Post (ATP) pickleball strategy diagram

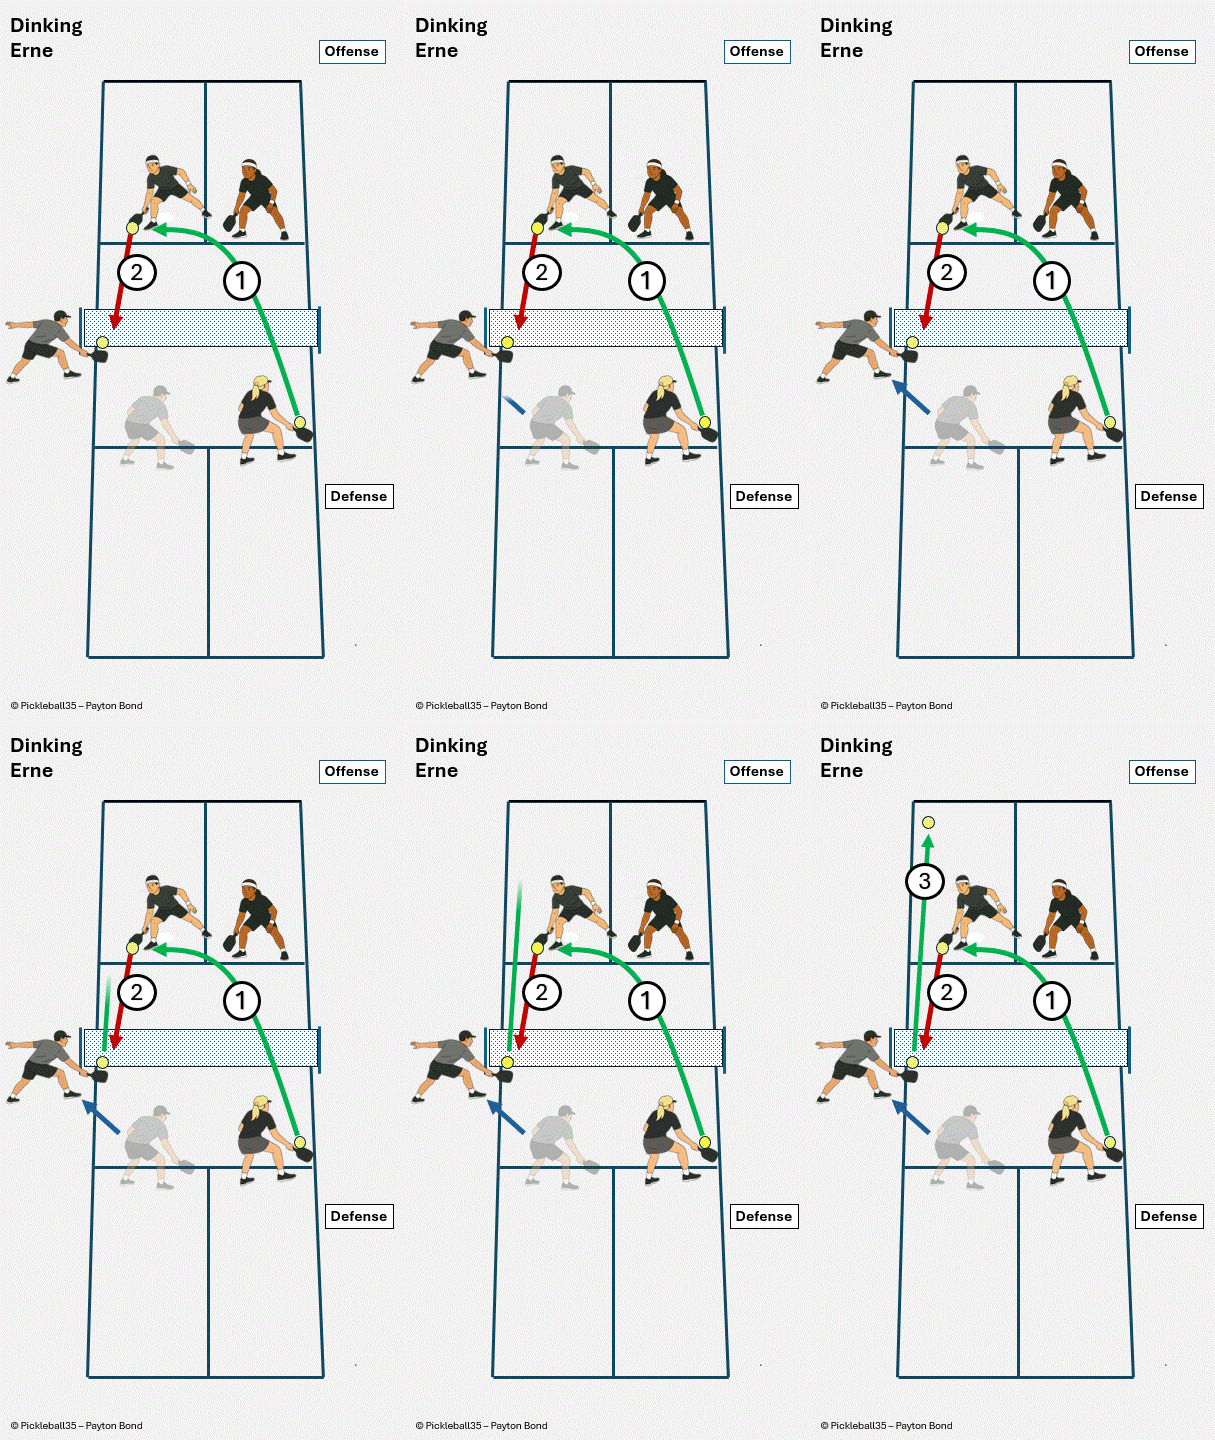
Erne

Erne pickleball strategy diagram

Explore These Strategies in Detail

The Pickleball Strategy app and book provide the complete explanations behind these visual diagrams.

Moving in the Transition Zone animated strategy diagram

Pickleball Strategy - 3.5+ Player App

100+ animated strategy scenarios for iPhone and Android.

Download the Free App

Explore 25 strategy scenarios and articles for free.

A one-time $9.99 in-app purchase unlocks the complete strategy library. No subscription.

Download on the App Store Get it on Google Play
Pickleball Strategy - A Guide to 3.5 and Beyond paperback

Pickleball Strategy

A Guide to 3.5 and Beyond

100+ strategy scenarios organized by every phase of the game.

The complete 300+ page pickleball strategy reference.

View on Amazon